You know that moment when you upload a photo to Instagram and it crops off the best part?
It’s the worst. I’ve been there too, trying to resize, re-upload, and still not get it right. Getting your Instagram image size right can be a real headache, but it still matters more than ever in 2026.
When your image isn’t sized properly, Instagram might cut off text, faces, or your main subject. It makes your feed look unbalanced and lowers your engagement.
Short Summary
- The ideal Instagram feed size in 2026 is 1080×1080 px for square and 1080×1350 px for portrait posts.
- Stories and Reels should be 1080×1920 px with a 9:16 ratio for the best fit.
- Always keep key text and visuals in the safe zone to avoid cropping.
- Tools like Social Champ help you preview and schedule perfectly sized posts.
But when everything fits perfectly, your photos stand out, your profile looks professional, and your audience actually wants to stick around.
Consistent, high-quality visuals make a huge difference. They show your followers that you care about your brand, and it works.
In this guide, I’ll share with you the exact dimensions, safe zone tips, common mistakes to avoid, and easy tools to make resizing simple.
You will also find some various social media tools to use for your Instagram posting needs as you read ahead.
Let’s get into it!
Want Your Instagram Feed to Look Flawless?
What Is Instagram Image Size and Why It Still Matters in 2026
Instagram image size might sound like a small thing, but it actually has a big impact on how your posts look and perform.
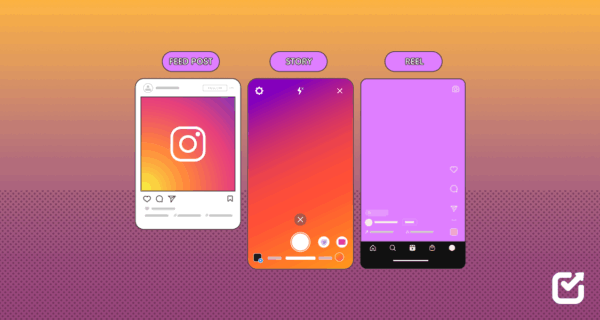
Getting your dimensions right can help your content look clear, professional, and eye-catching in every part of the app, from the feed to Reels and Stories.
Let’s break down what it really means and why it still matters in 2026.
What Is Image Size
Image size simply means how wide and tall your photo or video is, measured in pixels. Pixels are tiny dots that make up an image. When an image has more pixels, it looks sharper and more detailed.
For example:
- A small image (like 600 x 600 pixels) might look blurry on large screens.
- A larger image (like 1080 x 1080 pixels) stays crisp and clear on most devices.
Choosing the right image size helps your posts look their best, no matter where your audience is viewing them.
What Is Aspect Ratio
The aspect ratio is the shape of your image, how wide it is compared to how tall it is. It’s written as two numbers, like 4:5 or 1:1.
Here are some common Instagram aspect ratios:
- Square posts: 1:1 (Example: 1080 x 1080 pixels)
- Portrait posts: 4:5 (Example: 1080 x 1350 pixels)
- Landscape posts: 1.91:1 (Example: 1080 x 566 pixels)
- Stories and Reels: 9:16 (Example: 1080 x 1920 pixels)
Instagram accepts aspect ratios between 1.91:1 and 4:5 for feed posts.
If your image doesn’t fit within this range, Instagram will automatically crop it or add black bars to adjust the size. This is why getting your ratio right is so important; it ensures your photo looks exactly the way you want it to.
What Is Resolution and Why Does It Matter
Resolution means how clear your photo or video looks. It depends on how many pixels are packed into a small space. High-resolution images look smooth and detailed, while low-resolution images can appear pixelated or blurry.
When you upload to Instagram, the app sometimes compresses your images to make them smaller in file size. To avoid losing quality:
- Always upload high-resolution images (at least 1080 pixels wide).
- Avoid screenshots or stretched images.
- Use editing tools that maintain image clarity.
Instagram’s Upload and API Limits
Instagram has file size limits that you should keep in mind when uploading through the app or third-party tools.
Here are the key limits:
- Maximum file size: 8 MB for photos
- Supported formats: JPEG, PNG, and non-transparent files
- Maximum video length: 90 seconds for feed videos, up to 15 minutes for Reels
If your photo or video is too large, Instagram automatically compresses it, which can reduce quality. Keeping your files under these limits ensures faster uploads and better-looking results.
Featured Article: Best Time to Post on Instagram (Insights from 3 Million Posts)
What Are the Optimal Instagram Image Sizes for Feed, Carousel, and Profile
Getting your image size right can make your Instagram posts look clean, sharp, and professional.
Whether you’re posting a single photo, a carousel, or updating your profile picture, the right size keeps everything centered and easy to view.
Here’s a simple guide to help you pick the best image dimensions for every type of post.
Instagram Feed Image Size Guide
| Type | Aspect Ratio | Recommended Pixels (W x H) | Safe Zone |
|---|---|---|---|
| Square Post | 1:1 | 1080 x 1080 px | Keep the main subject in the center 1:1 area |
| Portrait Post | 4:5 | 1080 x 1350 px | Avoid placing text or faces near the top and bottom edges |
| Landscape Post | 1.91:1 | 1080 x 566 px | Keep key elements in the middle third of the image |
Here’s a little tip to keep in mind:
- Square posts are best for quotes or graphics since they look balanced in your feed.
- Portrait posts are great for product photos or people shots because they take up more screen space.
- Landscape posts are ideal for wide shots like travel or scenery photos.
Carousel Post Sizes
Carousel posts let you share multiple photos or videos in a single post. Each image should have the same aspect ratio so your audience doesn’t see size jumps while swiping.
| Type | Aspect Ratio | Recommended Pixels (W x H) | Safe Zone |
|---|---|---|---|
| Square Carousel | 1:1 | 1080 x 1080 px | Keep text and logos in the center |
| Portrait Carousel | 4:5 | 1080 x 1350 px | Leave some space at the top and bottom for captions |
| Landscape Carousel | 1.91:1 | 1080 x 566 px | Keep main visuals within the center third |
Here’s a little tip:
- Use portrait carousels to tell stories or showcase detailed products.
- Use square carousels for infographics or tutorials that need clear text.
Profile Image Size
Your Instagram profile photo is what most people notice first. It’s small, but it matters a lot for branding and recognition.
| Type | Aspect Ratio | Recommended Pixels (W x H) | Safe Zone |
|---|---|---|---|
| Profile Picture | 1:1 (Circle crop) | 320 x 320 px | Keep your logo or face centered; edges may be cropped in a circle |
We recommend that you:
- Use a simple background so your face or logo stands out.
- Avoid text near the edges, since Instagram crops social media picture sizes into a circle.
Featured Article: How to Add Multiple Photos to an Instagram Story
What Are the Ideal Dimensions for Instagram Stories and Reels in 2026
Instagram Stories and Reels are all about full-screen visuals.
When your video or photo fits perfectly on the screen, it looks professional, engaging, and easier to watch.
Getting the size right makes sure nothing important gets cut off or hidden behind buttons or text.
Ideal Story and Reel Dimensions
Both Instagram Stories and Reels use the same vertical format. This makes it simple to create one piece of content that works for both.
| Type | Aspect Ratio | Recommended Pixels (W x H) | Safe Zone |
|---|---|---|---|
| Story | 9:16 | 1080 × 1920 px | Keep all text and faces in the center area |
| Reel | 9:16 | 1080 × 1920 px | Keep captions and titles away from the top and bottom edges |
Always design your Story or Reel with some padding at the top and bottom. Instagram icons, usernames, and buttons appear there, so avoid placing text or logos too close to those spots. There are many Instagram management tools available to help you save time and effort.
Cover Photo and Thumbnail Sizing
Your Reel cover photo or Story highlight thumbnail is the first thing people see. A good cover makes your video look polished and clickable.
- Cover size: 1080 × 1920 px (same as your video)
- Profile view crop: Instagram shows your Reel cover as a 1:1 square on your profile grid, so keep the main subject or title in the center of the image.
- Avoid placing important text at the top or bottom, as it may be hidden behind your username or other icons.
You can also keep your titles within the middle safe zone (1080 × 1420 px) so they always stay visible in the feed and grid.
Best Export Settings
To keep your Stories and Reels looking crisp without slowing upload times, use these simple export settings:
- Format: MP4 (recommended)
- Resolution: 1080 × 1920 px
- Frame rate: 30 fps or higher
- File size: Under 15 MB for best upload quality
- Compression: Use a light compression tool (like HandBrake or Adobe Media Encoder) to keep quality high and file size small
Remember always to preview your video after export. Sometimes compression tools shift the crop or color tone.
Story vs Reel Dimension Comparison
| Feature | Instagram Story | Instagram Reel |
|---|---|---|
| Aspect Ratio | 9:16 | 9:16 |
| Size (Pixels) | 1080 × 1920 | 1080 × 1920 |
| Length Limit | 15 seconds per Story | Up to 15 minutes |
| Visible Elements | Stickers, links, text | Captions, audio, hashtags |
| Best Use | Quick updates, polls, and behind-the-scenes | Tutorials, entertainment, and product demos |
Interactive Slider: Wrong Crop vs Right Crop
| Wrong Crop | Right Crop |
|---|---|
| Text and faces cut off by icons | All text and faces are centered properly |
| Cropped top or bottom edges | Full visual fills the screen perfectly |
| Blurry or low-quality upload | Clear and high-resolution look |
Featured Article: How to Share an Instagram Post to Your Story
What Common Instagram Image Size Mistakes Should You Avoid
Even the best-looking photo can lose its charm if it’s uploaded in the wrong size.
Small mistakes like low-quality images, cropped captions, or mismatched carousels can ruin how your post appears on your feed. The good news is that these mistakes are easy to fix once you know what to look for.
Here’s a simple side-by-side guide to help you understand what to avoid and what works better.
Instagram Image Size Mistakes and How to Fix Them
| Mistake | Better Option | Why It Works |
|---|---|---|
| Uploading low-resolution images | Use high-resolution images (at least 1080 px wide) | Keeps your post sharp and clear on all screens |
| Ignoring safe zones | Keep text, faces, and logos in the center 80% of your image | Prevents important parts from being covered by captions or buttons |
| Using different aspect ratios in a carousel | Use the same ratio for every carousel slide | Creates a smooth and professional viewing experience |
| Uploading oversized files (over 8 MB) | Compress files before upload without losing quality | Speeds up uploads and keeps your visuals crisp |
Quick Fix Workflow Before Posting
Before hitting the upload button, use this quick checklist to make sure your post looks perfect:
- Preview: Check how your image looks on your phone screen.
- Resize: Adjust your image size to match the proper aspect ratio (use tools like Canva or Social Champ’s Canva integration).
- Upload: Once it looks balanced, upload it to Instagram.
Pro Tip: Always test your posts on a preview screen before posting. A slight adjustment now can save you from awkward crops later.
Instagram Image Dos and Don’ts
| ✅ DOs | ❌ DON’Ts |
|---|---|
| Use 1080 px width for all posts | Upload blurry or pixelated images |
| Keep text inside safe zones | Add text near the edges |
| Use consistent sizes in carousels | Mix square and portrait slides |
| Preview before posting | Post without checking layout |
How Social Champ Can Help
If you often struggle with image sizing or alignment, Social Champ makes things much easier.
Inside the Publish Dashboard, you can preview your Instagram posts side by side before posting. This lets you check if your text, images, or carousels fit correctly without cropping issues.
You can also schedule and resize posts directly from one place, saving time and effort.
Below is an example of Social Champ’s Publish Dashboard, where you can preview your post before going live:

To resize your image from within the dashboard, click on “Edit Image” and select resize from the bottom panel:

Tired of Your Posts Getting Cut Off?
How Can You Resize and Schedule Perfectly Sized Instagram Images Easily
Getting your Instagram images to look clean and professional is all about resizing them the right way before you post.
You don’t need to be a designer to do this; a few simple steps can make your photos look perfect on every device.
Here’s how you can do it easily:
Use Free Tools to Batch Resize Images
You can resize your images quickly using simple tools like:
- Canva: Upload your photos and use the “Resize” feature to set exact Instagram dimensions (1080×1080 for square, 1080×1350 for portrait, etc.).

- Figma: Great for batch resizing multiple images at once. Just set your frame sizes and export them all together.

- Adobe Photoshop: Use the “Image Size” option under the “Image” menu to set custom dimensions and keep the quality high.

This way, you can prepare all your posts for the week or month at once.
Export Settings That Keep Quality High
When you’re done resizing, make sure to export your images correctly:
- Format: Use JPG for regular photos and PNG for images with text or graphics.
- Quality: Set between 80–90% to keep your images sharp but not too heavy in size.
- Compression: Light compression helps your post load fast without losing clarity.
Quick Checklist Before Uploading
Use this short checklist to make sure your image is ready to post:
- Correct dimensions (1080×1080, 1080×1350, or 1080×1920)
- File format set to JPG or PNG
- Image compressed (quality 80–90%)
- Safe zones checked (no text cut off)
- Previewed before posting
Bonus Tip:
If you’re scheduling posts through Social Champ, the built-in image preview shows exactly how your photo will appear on both mobile and desktop. This means nothing important gets cropped or misplaced.

What Future Updates Could Affect Instagram Image Sizes
Instagram is always testing new updates, so the image sizes we use today might not stay the same forever. Keeping an eye on these changes can help your posts look fresh and professional.
Rumored Grid Experiments and Taller Posts
Instagram has been testing different grid layouts that could change how your feed looks.
Some users have spotted 4:5 and even taller post ratios appearing in their tests.
If this becomes official, your current square images might look smaller or less centered on the new layout. It’s a good idea to start creating vertical-friendly posts (1080×1350 px) so your content looks great in any format.
AI-Driven Cropping and Smart Framing
Instagram is also exploring AI-based tools that can automatically crop and frame your IG images and videos. These tools may adjust your photo based on faces, objects, or background focus.
That means your image and Instagram video length could look slightly different after uploading, especially if the AI decides to zoom in or reframe it for better visual balance. So, try to keep the main subject centered and avoid placing text too close to the edges.
Stay Updated With Official Resources
Instagram often announces visual updates first on the Instagram Creators Blog.

Checking it regularly helps you stay ahead of layout or image size changes.
You can also follow Social Champ’s blog and social media news resources, where we break down every major update and explain how to adjust your content easily.
Ready to Post Like a Pro?
Conclusion
Getting your Instagram image size right can make your feed look clean, sharp, and professional.
It’s not just about pixels, but how your content feels to your audience.
When your photos fit perfectly, your captions stay readable, and your visuals look balanced, people are more likely to engage.
The good news is you don’t need to be a designer to get it right.
With tools like Canva for resizing and Social Champ for previewing and scheduling, creating perfectly sized Instagram posts in 2026 is easier than ever.
Keep things simple, stay updated, and post with confidence.